
9 Ways to fix DKIM and SPF failures. Using DMARC aggregate reports to ensure your customers receive your emails
- Mihailo Rnic

- Feb 24
- 6 min read

Most companies use email either to communicate with customers and suppliers or to promote and market their business. It is crucial to ensure these emails are received by customers without being flagged as spam. If emails are not being clicked on this could be due to incorrectly configured SPF or DKIM records which causes the emails to be placed in the recipients’ junk folder, flagged as ‘unverified’ or simply not delivered. This is where DMARC aggregate reports can be used to diagnose delivery problems.

Enabling DMARC aggregate reports
The DMARC protocol includes a mechanism for recipient mail servers to send aggregate reports summarising the results of SPF and DKIM checks to the sending party. They are extremely useful in diagnosing problems with email delivery.
The recipient address for the reports is configured as part of your DMARC record. In the example below the field rua= is followed by the email address you wish to receive your reports e.g. here we have used dmarc@duvetnotes.com

Aggregate reports provide a summary of email authentication results for a domain over a default 24-hour period. The frequency at which these reports are sent can be changed by adding the ‘ri’ tag with a time period in seconds to the DMARC record. However, receiving mail providers are under no obligation to honour the request and may continue to send aggregate reports every 24 hours.
These reports are sent as XML to the address specified in the DMARC record for a domain.
The information will include the following:
• The time period (24hour block)
• The sending IP address of the last email server (before it reaches the reporting mail server) to handle the mail.
• The quantity of emails.
• The destination domain.
• Header information, specifically, the envelope (smtp server) from address and the mail from address.
• The result (pass/failure) of the mail provider’s SPF and DKIM checks for that particular email.
Aggregate reports can be rendered in a more readable format than the original XML file to produce a graphical version. There are many free tools available on the web which permit you to upload your raw XML aggregate report, rendering it more readable. One such example is below:

(image 2)
In the above example, Enterprise Outlook (Exchange Online) have generated an aggregate report where 3 emails have passed through their servers, in this case all 3 have passed both DKIM and SPF checks.
In the example below, the email has failed both SPF and DKIM.

SPF failures in aggregate reports, IP address or domain alignment failures?
SPF failures can take one of two forms, IP address or domain alignment failures.
IP address
The first thing to check is that the fail is not due to a IP address failure where the sending mail server is not using an IP address included in your SPF record. This could be a legitimate error, for example you have signed up to a marketing service to send emails on your behalf but have not yet added their SPF record to yours. Or it could be a spammer trying to send using a spurious IP address and the email is rightly failing an SPF check.
An easy way to check whether the sending IP address is in your SPF record is to use the spfquery command from a terminal prompt as below:
spfquery --ip-address ‘IP address to check’ -m sender@example.com
Example.1: An IP address is included in the SPF record. Result: SPF pass

Example 2: An IP address is not included in the SPF record. Result: SPF failure.

Alignment
If the IP check passes then the SPF failure will be due to an alignment failure where the domains in the ‘Mail-From’ and ‘Header-From’ fields differ. There are many ways to resolve this depending upon which mail provider you use to send mail. The solution here is with Amazon Simple Email Service (SES) but the principle will be the same for other mail providers.
If Amazon SES is your mail provider your outbound emails will fail SPF alignment checks because your mail-from domain (e.g. owta.net) and the default Amazon header-from domain (e.g email-smtp.eu-west-1.amazonaws.com) do not align.
This can easily be resolved by configuring a child mail-from domain (test.example.com) which will align with the parent header-from domain (example.com). In the example below the new child header-from domain is awsses.owta.net which will align with the parent mail-header domain of owta.net.
In Amazon SES, the mail-from domain can be configured here:

DKIM failures
DKIM failures are more complex due to the nature of DKIM which relies on public/private key cryptography. An essential starting point will be to verify that your DKIM record is indeed configured correctly.
Public key misconfiguration
Check that the DKIM public key exists as a TXT record using the command:
nslookup –type=txt <selector>._domainkey.<domain>
The public key is preceded by the p=tag as below. Note that rather than providing you with a public key some ISPs may provide you with a CNAME record referencing back to them (e.g. selector1-owta-net._domainkey.owtanet.onmicrosoft.com below)

Ensure that there are no discrepancies between the public key or CNAME record you have been given by your mail provider and the one you have used in your TXT record . A simple copy and paste error will be enough to cause a DKIM fail.
Due to Digital signing issues
Check that your outbound emails are actually being digitally signed by the mail provider by verifying the email headers. (To view the headers in Outlook right click on the message>View Source. In Gmail click on the three vertical dots>Show original). The DKIM signature is highlighted below. Contact your mail provider if the DKIM signature is missing.
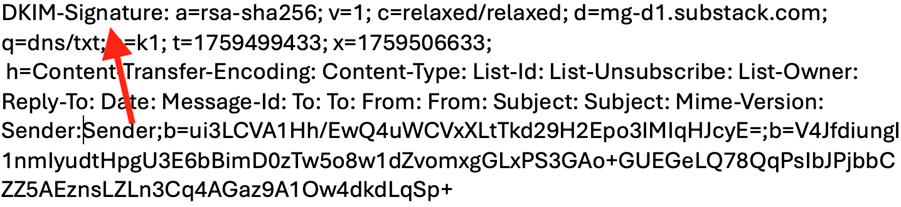
Recipient mail servers will look up the public key and then perform an algorithmic check that the DKIM signature in the header matches the public key. In a nut shell with no DKIM signature there will be no DKIM pass.
Due to Alignment
Ensure that DKIM has passed the domain alignment check by verifying that the domain in the d=tag is the same domain as that in the header from. The example header below shows this.

Verify your DKIM records
Check that your DKIM DNS record is publicly accessible. This can be achieved via a command prompt below. There are also many graphical tools available to do this.
Nslookup –q=txt <yourselector>._domainkey.<yourdomain>

If your DKIM record is not publicly accessible the mail servers performing the DKIM check will not be able to retrieve the public key and will be unable to validate the signature returning a fail error.
DNS issues may be caused by a variety of factors including network outages, or the recent creation or amendment of the DKIM record. DNS propagation delays may also be a contributing factor. Contact your DNS provider to exclude any hosting errors or delays which they will be able to resolve.
DKIM signature alteration in transit
Following DKIM signing mail servers can still alter the content of emails that may cause DKIM failures, particularly when emails are forwarded. Contact your mail provider to check that the DKIM signature has not been altered in anyway.
DKIM private and public keys expiring
By default DKIM private and public keys do not expire however it is considered good practice to rotate your keys periodically to mitigate the risk of malicious actors gaining access to the keys and engaging in spoofing. When updating your public and private keys allow 48 hours for DNS propagation.
Common email providers: DKIM key rotation policies
Provider | Rotation policy |
Amazon AWS | Keys rotated automatically every 90 days |
Microsoft 365 | Keys rotated automatically every 365 days. Can be manually rotated via a PowerShell command here |
Google Workspace | Keys can be manually rotated via the admin interface |
Selector problems
When using more than one email provider, ensure that the selectors used are unique. DKIM lookups will fail if the selectors have not been configured properly or are not unique. E.g If the same selector exists for two public keys the mail server that performs the DKIM lookup will not know which public key to use.
Check the source IP
The source IP in the first column (image 2) will indicate which server last processed the email before it reached Microsoft’s servers. This is particularly useful if you have multiple email providers sending out on your behalf. For example if you use AWS for communicating with customers and suppliers and a marketing company’s services such as Mailchimp for mailshots and promotions. By running the whois query on the IP address (example below) you will be able to identify which of these two providers the email came from.
This in turn will assist you in knowing which mail provider you need to contact for further enquiries. The whois lookup command below will show you the owner of the IP address.

For more information on this, take a look at
National Cyber Security Centre UK website.
Need extra help to determine why you are receiving SPF and or DKIM failures? Owtanet can help. Get in touch with us to discuss your concerns.
